

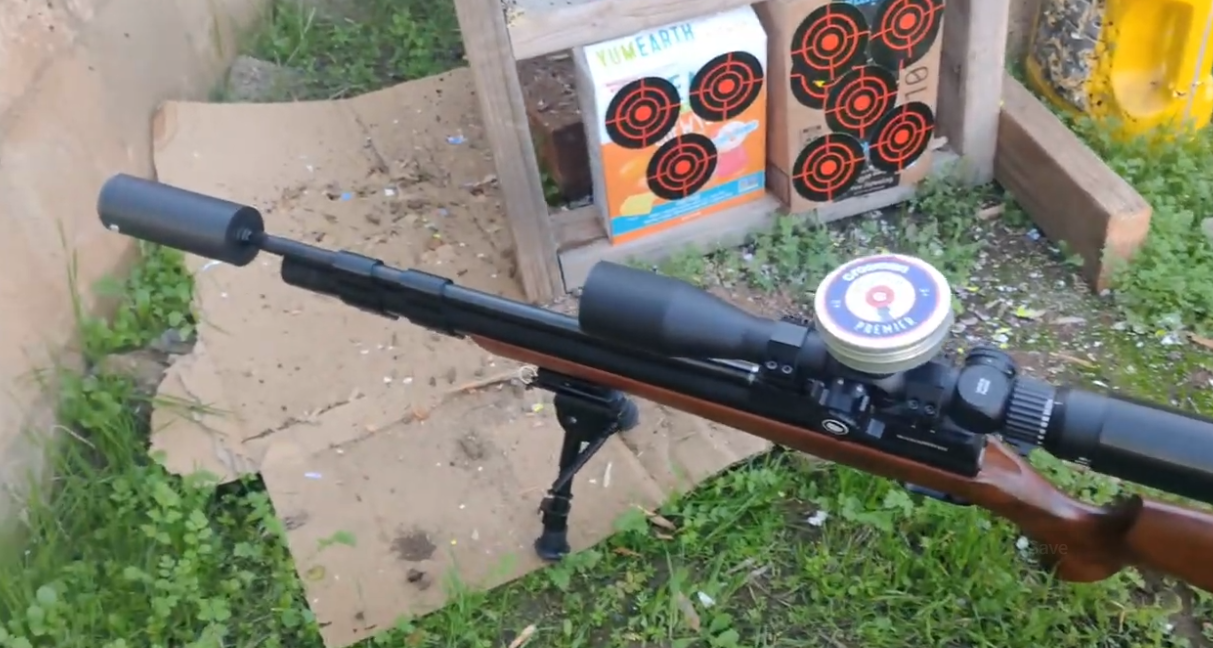
Pre-Charged Pneumatic (PCP) air rifles are prized for their extreme accuracy, match-grade consistency, and incredible power. However, unlike traditional spring-piston or break-barrel air guns, PCP air rifles operate under extreme internal pressure—often upwards of 2,000 to 4,500 PSI.
Because high-pressure air systems rely on delicate regulators, valves, and synthetic seals, regular maintenance isn't just recommended, it's essential for preventing air leaks, preserving accuracy, and extending your air gun's lifespan.
Why Routine PCP Air Rifle Maintenance Matters

High-pressure pneumatic systems are sensitive to friction, dirt, and material degradation. Proper routine care ensures:
-
Consistent Muzzle Velocity: Prevents micro-leaks that cause FPS (feet per second) drops.
-
Tight Shot Groups: Keeps barrel pressure stable shot after shot.
-
Extended O-Ring Lifespan: Protects high-pressure rubber seals from drying out or tearing.
-
Smooth Action & Triggering: Reduces internal friction on cocking levers and hammer springs.
-
Long-Term Savings: Eliminates expensive premature repairs and factory overhauls.
The Essential PCP Air Rifle Maintenance Toolkit

Before servicing your rifle, gather these specialized tools. Never substitute standard firearm supplies without checking material compatibility.
|
Tool |
Primary Purpose |
Key Recommendation |
|
Silicone Oil / Grease |
Lubricating O-rings & seals |
Use 100% pure silicone; NEVER petroleum-based oils. |
|
O-Ring Pick Set |
Removing & seating internal seals |
Brass or plastic picks prevent scratching metal surfaces. |
|
Microfiber Cloths |
Wipe down exterior surfaces |
Removes skin oils and prevents rust on blued steel. |
|
Cotton Swabs (Q-Tips) |
Precision lubricant application |
Ideal for breech seals and narrow fill-port recesses. |
|
Flexible Pull-Through Cleaner |
Cleaning the barrel bore |
Avoid steel cleaning rods that damage soft lead-shooting rifling. |
Step-by-Step Core PCP Air Rifle Maintenance Procedures

1. Check and Lubricate the Breech Seal Regularly
The breech seal is the unsung hero of your PCP air rifle. Depending on your specific model, this small rubber O-ring is usually located either just inside the rear of the barrel (the breech) or seated directly on the bolt probe itself.
It is one of the most frequently used—and heavily abused—sealing points on the entire gun. Every time you fire, this tiny ring has to trap a violent, instantaneous blast of high-pressure air (often 2,000 to 3,000 PSI). Furthermore, every time you cycle the action, a lead pellet scrapes directly past or through it, creating constant friction.
Signs of a Dry or Damaged Breech Seal
Because of this intense friction and pressure, breech seals will eventually dry out, flatten, or tear. When the seal fails, high-pressure air escapes backward instead of pushing the pellet forward. This causes:
-
Reduced Power: Your pellet velocity (FPS) will drop noticeably, impacting your range and hitting power.
-
Vertical Stringing: If the amount of escaping air varies slightly from shot to shot, your pellets will hit high and low on the target, ruining your accuracy.
-
Audible or Physical Air Leaks: You might hear a hiss or feel a physical puff of air near your cheek when firing.
The "Tissue Test":
If you suspect a leak, safely lay a single square of tissue paper over the breech area and fire a pellet into a safe backstop. If the tissue blows away or jumps violently, your breech seal is leaking and needs attention.
How to Maintain the Breech Seal
To keep this seal pliable, hydrated, and airtight, you should lubricate it every 200 to 300 shots. It only takes a minute, but the technique matters.
1. Ensure the rifle is safe: Crucial first step.
Remove the magazine, visually verify that the chamber is empty, and ensure the safety is engaged.
2. Prep your applicator: Silicone only.
Apply a tiny drop of 100% silicone oil or silicone grease to the tip of a cotton swab (Q-tip). Never use standard firearm solvents or petroleum-based oils. Petroleum degrades the synthetic rubber used in PCP seals and can dangerously combust under high air pressure.
3. Coat the seal gently: Light application.
Pull the bolt back to expose the breech area.
-
If the O-ring is on the bolt probe: Gently wipe the oiled swab in a circle around the probe.
-
If the O-ring is inside the barrel: Carefully insert the swab slightly into the breech and twirl it lightly against the internal rubber ring.
4. Remove the excess: Don't skip this.
Flip the cotton swab over and use the dry end to wipe away any visible globs of grease or oil. You only want to leave a microscopic, shiny film behind.
A Warning on Over-Lubricating
More is not better. If you leave excess grease on the seal, it acts like a magnet for dust, dirt, and microscopic lead shavings. This debris turns the lubricant into an abrasive paste that acts like sandpaper, destroying your seal much faster than if you had left it completely dry. Keep it minimal!
2. Inspect and Replace Worn Breech Seals
Even with a strict lubrication routine, breech O-rings are high-wear consumables. Between constant exposure to extreme pressure spikes and mechanical cycling, a breech seal will eventually need to be replaced.
Knowing how to spot a failing seal and how to swap it cleanly without scratching your rifle is a core skill for any PCP owner.
How to Inspect a Breech Seal
Perform a visual inspection under good lighting every few range sessions or whenever you notice performance dropping:
-
Visible Cracks or Fraying: Micro-tears along the inner edge of the ring indicate friction breakdown from loading pellets.
-
Flattening (Loss of Elasticity): Instead of a rounded profile, the O-ring looks squared-off or flush with the metal recess, preventing it from forming a tight seal.
-
Discoloration or Hardening: If the synthetic rubber feels hard to the touch rather than soft and pliable, it has dried out beyond repair.
-
Erratic Chronograph Readings: If your muzzle velocity fluctuates by more than 15–20 FPS between shots without any changes in pellet weight, a leaking breech seal is usually the culprit.
Step-by-Step Breech Seal Replacement Guide
Replacing a breech seal is straightforward, but it requires patience. A scratched breech recess will leak air permanently, even with a fresh O-ring installed.
1. Ensure the rifle is safe & degassed (if required): Safety check.
Unload the rifle, remove the magazine, and pull the cocking lever back. While replacing a breech seal usually doesn't require draining the air reservoir, keeping the cocking mechanism locked open ensures the probe won't snap forward while you work.
2. Select the right pick tool: Protect the metalwork.
Use a brass, wooden, or plastic pick tool rather than a sharp steel dental pick if possible. Hardened steel picks can easily scratch the soft metal inside the barrel recess. If you must use a steel pick, cover the tip with a small piece of electrical tape.
3. Remove the worn O-ring: Lift, don't scrape.
Gently slide the pick point underneath the old O-ring, pry it upward slightly to catch a lip, and roll it out of its groove. Avoid digging into the metal seat underneath.
4. Clean the empty groove: Remove debris.
Wrap a dry cotton swab in a lint-free cloth and push it into the empty ring groove. Spin it around to sweep out old grease, dirt, and lead dust.
5. Prep and install the new seal: Lubricate before seating.
Lightly coat your new replacement O-ring in pure silicone grease. Pinch the ring into a slight heart shape (oval) between your fingers to make it smaller, drop it into the breech opening, and allow it to spring open inside the groove.
6. Seat and test the seal: Verification.
Use a soft plastic tool or the smooth end of a cotton swab to press around the entire circumference of the ring until it snaps fully into its recess. Cycle the bolt smoothly by hand a couple of times to ensure it seals tightly without catching.
Note on Replacement Seal Sizing
Never guess or use generic hardware-store O-rings on a PCP air rifle. Hardware-store O-rings are typically made for low-pressure water plumbing and use rubber formulations that degrade when exposed to high-pressure air spikes.
-
Match the Shore Hardness (Durometer): PCP seals are rated by hardness (typically 70 to 90 Durometer). An O-ring that is too soft will shred instantly under 3,000 PSI; one that is too hard won't conform to the probe to create an airtight seal.
-
Match the Exact Material: Look for Nitrile (NBR) or Fluorocarbon (Viton) seals specified by your rifle's manufacturer.
-
Keep Spares in Your Kit: Keep a 5-pack of factory-spec breech O-rings in your shooting bag. They are inexpensive and save a ruined day at the range.
3. Maintain the Regulator and Air Cylinder Seals
The regulator acts as the internal "brain" of a PCP air rifle. Its job is to take raw, fluctuating reservoir pressures (often 200–300 bar or 3,000–4,500 PSI) and meter it down to a fixed, ultra-consistent working pressure (typically 100–150 bar) for the firing valve.
Because these components live directly in the high-pressure zone, their seals are subjected to constant static compression. Over time, rubber seals lose elasticity or develop micro-imperfections, leading to leaks or performance shifts.
Key Seals in the High-Pressure System
-
Air Bottle/Cylinder Neck Seals: Located on the threads where a carbon fiber bottle or aluminum cylinder screws into the action block. These are exposed to friction every time a bottle is removed or attached.
-
Regulator Inlet/Piston Seals: Small, high-durometer O-rings inside or surrounding the regulator body that seal off the high-pressure air stream once working pressure is reached.
-
Fill Probe / Quick-Disconnect Seals: External O-rings on your filling adapter that seal the high-pressure air line when topping off your rifle.
How to Identify Regulator and Cylinder Seal Issues
Regulator issues present differently than simple breech leaks. Watch out for these three major warning signs:
-
Regulator Creep: You fill your gun to 250 bar, and the regulator gauge initially reads 130 bar. However, over the next few hours, the gauge slowly rises to 160+ bar. This indicates the regulator's internal valve piston seat or O-ring is failing to shut off air flow completely.
-
Slow Pressure Loss Overnight: If your reservoir drops from 200 bar to 100 bar while sitting in your gun safe, an air cylinder connection seal, manometer O-ring, or fill port check valve is leaking.
-
Extreme Velocity Spikes or Drops: An erratic regulator output leads to wild swings in feet-per-second (FPS), causing shot groups to open up dramatically.
Safety First: The Golden Rule of High-Pressure Maintenance
CRITICAL SAFETY WARNING: Never attempt to unscrew an air cylinder, regulator block, or manometer while the system is under pressure. Pressurized threads can strip violently, turning metal components into dangerous projectiles. Always fully degas (depressurize) the air system before attempting any disassembly.
Step-by-Step Maintenance Procedures
1. Degas the rifle completely: Mandatory safety step.
Use your rifle's built-in bleed screw, dry-fire down past the regulator floor (if recommended by the manufacturer), or use a degassing tool to vent all air until both the main bottle gauge and regulator gauge read absolute zero.
2. Inspect and service connection O-rings: Routine preventative care.
Unscrew the air bottle or cylinder. Inspect the outer O-rings on the male neck threads for pinching, flattening, or dirt. Apply a tiny smear of heavy silicone grease across the ring surface to keep the rubber pliable and reduce friction during re-threading.
3. Maintain fill probe O-rings: Every 5-10 fills.
Fill probe O-rings take a beating from high-velocity air during fillups. Wipe away dirt or metal dust from the probe body and apply a microscopic drop of 100% silicone oil to both rubber rings.
4. Address internal regulator seals: Advanced maintenance (Every 2-3 years).
If experiencing regulator creep, remove the regulator assembly according to the manufacturer's manual. Clean the Belleville washer stack, inspect the tiny Belleville/piston O-rings, and replace any hardened seals using a factory-spec rebuild kit.
Seal Maintenance Frequency
|
Component |
Maintenance Type |
Recommended Frequency |
|
Fill Probe O-Rings |
Clean & lightly oil |
Every 5–10 fill cycles |
|
Air Bottle/Cylinder Neck O-Ring |
Clean & coat with silicone grease |
Every time bottle is removed |
|
Internal Regulator Seals |
Full inspection & seal replacement |
Every 2–3 years (or at first sign of creep) |
Common PCP Air Rifle Maintenance Mistakes

DANGER — PETROLEUM OIL WARNING: Never use standard firearm gun oils, WD-40, or petroleum-based solvents inside a PCP air system. Under extreme pressures, petroleum compounds can combust violently (a process called dieseling or detonation), leading to catastrophic equipment failure or severe injury.
-
Over-Lubrication: Excess oil attracts dust, dirt, and grit into the action, turning into an abrasive paste that wears out moving parts faster. A microscopically thin film is all you need.
-
Unauthorized Teardowns Under Pressure: Never attempt to unscrew air cylinders, regulators, or valve assemblies while the system is pressurized. Always degas the rifle completely according to manufacturer instructions before deep disassembly.
Recommended PCP Air Rifle Maintenance Schedule

Maintaining your PCP air rifle doesn't require hours of work—just consistency. Following a simple schedule based on shot count and time will keep your rifle accurate, leak-free, and performing at its best.
Daily Care: After Every Shooting Session
Moisture, sweat, and hand oils contain acids that cause surface rust on blued steel and raw metal. Before storing your air gun:
-
Wipe down all exterior metal and stock surfaces with a clean microfiber cloth.
-
Inspect the breech area and loading tray for trapped dirt, grit, or lead debris.
-
Store the rifle with a resting air pressure of 100–150 bar to keep internal seals properly compressed without overstressing them.
Routine Care: Every 200 to 500 Shots
High-use friction points like the breech area and fill connections require regular lubrication to stay airtight and pliable:
-
Apply a tiny dab of 100% silicone grease to the breech seal with a cotton swab, wiping away any excess.
-
Inspect fill probe O-rings for cracks or dirt, applying a light film of silicone oil to prevent tears during filling.
-
Check stock screws and rifle scope mount bolts to ensure recoil vibration hasn't loosened them.
Seasonal Care: Annual Checks (or Every 2,000 Shots)
Synthetic seals gradually dry out over time, even with minimal use. An annual checkup keeps your internal regulator consistent:
-
Clean the barrel using a soft pull-through patch system (never use steel cleaning rods, which ruin delicate air gun rifling).
-
Remove the air bottle or cylinder to inspect and grease its thread connection O-rings.
-
Run a string of shots over a chronograph—a sudden spike in velocity spread often signals an aging internal seal.
Long-Term Servicing: Every 2 to 3 Years
Under constant high pressure, internal valve seats and regulator O-rings eventually lose their elasticity and require a complete refresh:
-
Fully degas the rifle and replace all internal regulator, valve, and manifold O-rings using a factory rebuild kit.
-
If you lack specialized degassing tools or technical experience with high-pressure systems, send the rifle to an authorized technician for a full overhaul and pressure check.
When to Perform Deeper PCP Air Rifle Maintenance

Basic care—like wiping down the exterior and oiling the breech seal—is easy. However, opening up a PCP rifle to service internal components requires technical confidence, specialized tools, and strict safety awareness.
What "Deep Maintenance" Actually Involves
Taking a PCP air gun beyond surface-level care typically requires full workshop tools and precision setup. Deep tasks include:
-
Complete System Degassing: Safely discharging every bit of compressed air from both the main reservoir and the regulator plenum using specialized bleed screws or degassing tools.
-
Removing Pressurized Vessels: Unscrewing high-pressure air tubes or carbon-fiber bottles, which requires inspecting internal aluminum and steel threads for stress fractures or galling.
-
Tuning and Rebuilding Regulators: Disassembling the internal regulator block, replacing micro O-rings, and recalibrating Belleville washer stacks to precise output pressures using an external regulator tester gauge.
-
Replacing Internal Valve Seats: Servicing the main firing valve (poppet valve) and valve return springs—components deep inside the action block that dictate air delivery per shot.
-
Cleaning Internal Stripper Chambers & Plenums: Removing internal corrosion or oil accumulation that builds up over years of damp hand-pump refills.
DIY vs. Professional Tech
Before opening your rifle, consider three main factors:
|
Factor |
Ask Yourself |
Recommendation |
|
Tools |
Do I have brass picks, regulator test rigs, and strap wrenches? |
Without proper tools, standard steel keys can strip soft aluminum threads. |
|
Warranty |
Is the rifle still covered by the manufacturer? |
Opening internal regulator blocks almost always voids your warranty. |
|
Safety |
Can I safely degas and leak-test the high-pressure system? |
If you cannot safely degas the rifle, do not attempt the repair. |
Checklist Before Sending for Professional Repair
-
Check Warranty & RMA: Contact the manufacturer first to secure a Return Merchandise Authorization (RMA).
-
Confirm Service Lead Times: Ask for a written quote and estimated turnaround time before shipping.
-
Prep for Shipping: Completely degas the rifle to 0 Bar/PSI, remove the rifle scope and accessories, and pack it securely in a hard case.
FAQ
How often should you service a PCP air rifle?
Routine basic service—such as lightly lubricating the breech seal and fill probe O-rings—should be performed every 200 to 500 shots, while a quick exterior wipe-down is needed after every shooting session.
Deep internal servicing, which involves replacing internal regulator O-rings, valve seals, and high-pressure gaskets, is generally recommended every 2 to 3 years or whenever you notice significant pressure leaks or velocity drops.
What is the best oil for a PCP air rifle?
The safest and best lubricant for a PCP air rifle is 100% pure silicone oil or silicone grease. Silicone is completely chemically inert, meaning it won't break down, swell, or dry out the synthetic rubber O-rings and seals that keep your high-pressure system airtight.
Is it bad to dry fire a PCP air rifle?
Dry firing a PCP air rifle is generally safe for most modern models as long as the air cylinder contains sufficient air pressure to cushion the valve stem. However, you should never dry fire a PCP rifle when the reservoir is completely empty (0 bar/PSI), as the hammer striking an unbuffered firing valve can severely bend or shatter internal valve components.
What is the lifespan of a PCP air rifle?
A quality PCP air rifle can easily last a lifetime (20+ years) with basic care and routine seal replacements. Because the structural components like the steel barrel, receiver, and air cylinder suffer minimal physical wear, replacing inexpensive rubber O-rings every few years will keep the gun performing like new indefinitely.
Can I use WD-40 to clean my air rifle barrel?
No, you should never use standard WD-40 to clean a PCP air rifle barrel. Standard WD-40 contains petroleum distillates and harsh solvents that degrade rubber O-rings, strip away essential metal blueing, and pose a severe combustion hazard if forced into high-pressure air chambers.
How long can you leave air in a PCP air rifle?
You can safely leave air in a PCP air rifle indefinitely, and in fact, you should store it with air inside. Maintaining a resting pressure of roughly 100 to 150 bar (1,500 to 2,200 PSI) keeps constant, positive pressure on internal seals, preventing dust from entering and keeping O-rings seated properly so they don't dry out.
Should you oil the barrel of an air rifle?
You should never leave a heavy film of oil inside the bore of an air rifle barrel, as oil accumulation attracts dirt and creates accuracy-destroying hydraulic drag on lead pellets.
After cleaning, you may pull a single patch lightly dampened with silicone oil through the bore for long-term rust prevention during storage, but always pull a clean, dry patch through before your next shooting session.
Can you leave a PCP air rifle loaded?
No, you should never leave a PCP air rifle loaded with a pellet in the chamber. Leaving a pellet chambered creates an obvious safety hazard and keeps the internal hammer spring compressed under tension, which weakens the spring over time and causes noticeable velocity drops.
Final Words
Fortunately, keeping your setup in peak condition doesn't require hours at the workbench or a master degree in engineering.
By staying proactive with pure silicone lubrication, handling seals with care, and knowing when to hand complex repairs over to a qualified technician, you'll protect your investment for years to come. Take a few extra minutes after your next range session to wipe down your rifle and inspect your O-rings, your targets will thank you!




Share:
Pinty Falcon vs Air Venturi Avenge-X Bullpup (210cc) vs JTS Brawn Bullpup: Which PCP Air Rifle Is the Better Buy?
How to Maintain a PCP Air Rifle & Stop Air Leaks: Real Shooter Guide